Time Budget Mobile is an application that you can use to track the time you spend working on different projects. You can also set a weekly budget in hours for a project so you can see if you achieved your weekly goal of working a certain number of hours for that project.
This user manual will show you how to use the Time Budget Mobile application. It will show you how to create projects and how to record the time you spend working on those projects. It will also show you how to create and generate an invoice.
First Time Startup
The first time you run the Time Budget Mobile application you will be presented with the following welcome screen:

You have two choices on the welcome screen:
- Create Customer
- Synchronize Data
Choosing the Create Customer option opens the customer creation screen, where you can enter the details of the first customer you want to track time for.

Enter the following details for your first customer:
- Name
- The name of the person who is your primary contact for your customer,
- Company name
- Your customer’s company name.
- Address
- The street portion for your customer’s business address.
- City
- The city for your customer’s business address.
- State
- The state or province for your customer’s business address.
- Postal Code
- The postal code for your customer’s business address.
- Phone number
- Your customer’s phone number.
- Price per hour
- The amount you charge the customer per hour.
- Tax percentage
- The amount of tax you charge the customer. For example, if you charge 13% HST enter the value 13 for this field.
Once you have filled in the customer information, press the Save button in the top right corner of the screen to create your customer. The Time Budget Mobile application will now display its customer list screen, which allows you to create additional customers and to see a list of customers that you have already defined.

After you have finished creating customers, press the Close button. This will take you to the Week View screen, which is the main screen for Time Budget Mobile.
Note that if you want to edit or delete a customer, you can press on the name of the customer in the customer list. This will open the Edit Customer screen, where you edit the customers information or delete the customer.
Week View
The main screen of Time Budget Mobile shows each project you have defined and the number of minutes you have spent working on each project for each day of the week. It defaults to showing the current week, but you can change the current week being displayed using the buttons at the top of the screen.
The main screen also shows which customer you are currently viewing. Only projects for that cuistomer will be displayed. To switch to a different customer, press on the customer name at the top of the screen and choose which customer you want to view.
The controls on the main screen are as follows:
- Question mark icon
- The question mark icon at the top of the screen opens an info screen that shows you the version number for Time Budget Mobile. The info screen also has a User Manual button that you can use to open the Time Budget Mobile user manual.
- Customer name
- Press on the customer name at the top of the screen to change which customer you are viewing projects for.
- Previous Week button
- This button lets you switch to the previous week. Keep pressing this button to change which week you are viewing.
- Choose Week button
- This button displays a popup screen that lets you choose which week you want to view.
- Next Week button
- This button lets you switch to the next week. Keep pressing this button to change which week you are viewing.
- Show Projects With No Time button
- This button toggles between showing and hiding projects that have no time entries for the current week. If you only want to see the projects that you have entered time for, turn this option off. To see all projects, turn this option on.
- Menu button
- This button opens a menu with several commands:
- View Time Entries By Day
- Month Overview
- New Project
- New Time Entry
- Projects
- Invoices
- Customers
- Invoice Templates
- Synchronize Data
- This button opens a menu with several commands:
Creating Your First Project
Before you can start entering time for the projects you have worked on, you need to create a project. To do so, press the Menu button, then press the New Project command. This will open the New Project screen.

Enter the following information for your new project:
- Enter a name for your project.
- Enter a description for your project.
- Enter a weekly budget in hours for your project. This sets a goal for how many hours you want to work on that project each week.
- Choose the customer that the project is for
After entering this information, press the Save button in the top right corner of the screen to finish creating your project. This will save the project and return you to the main screen.
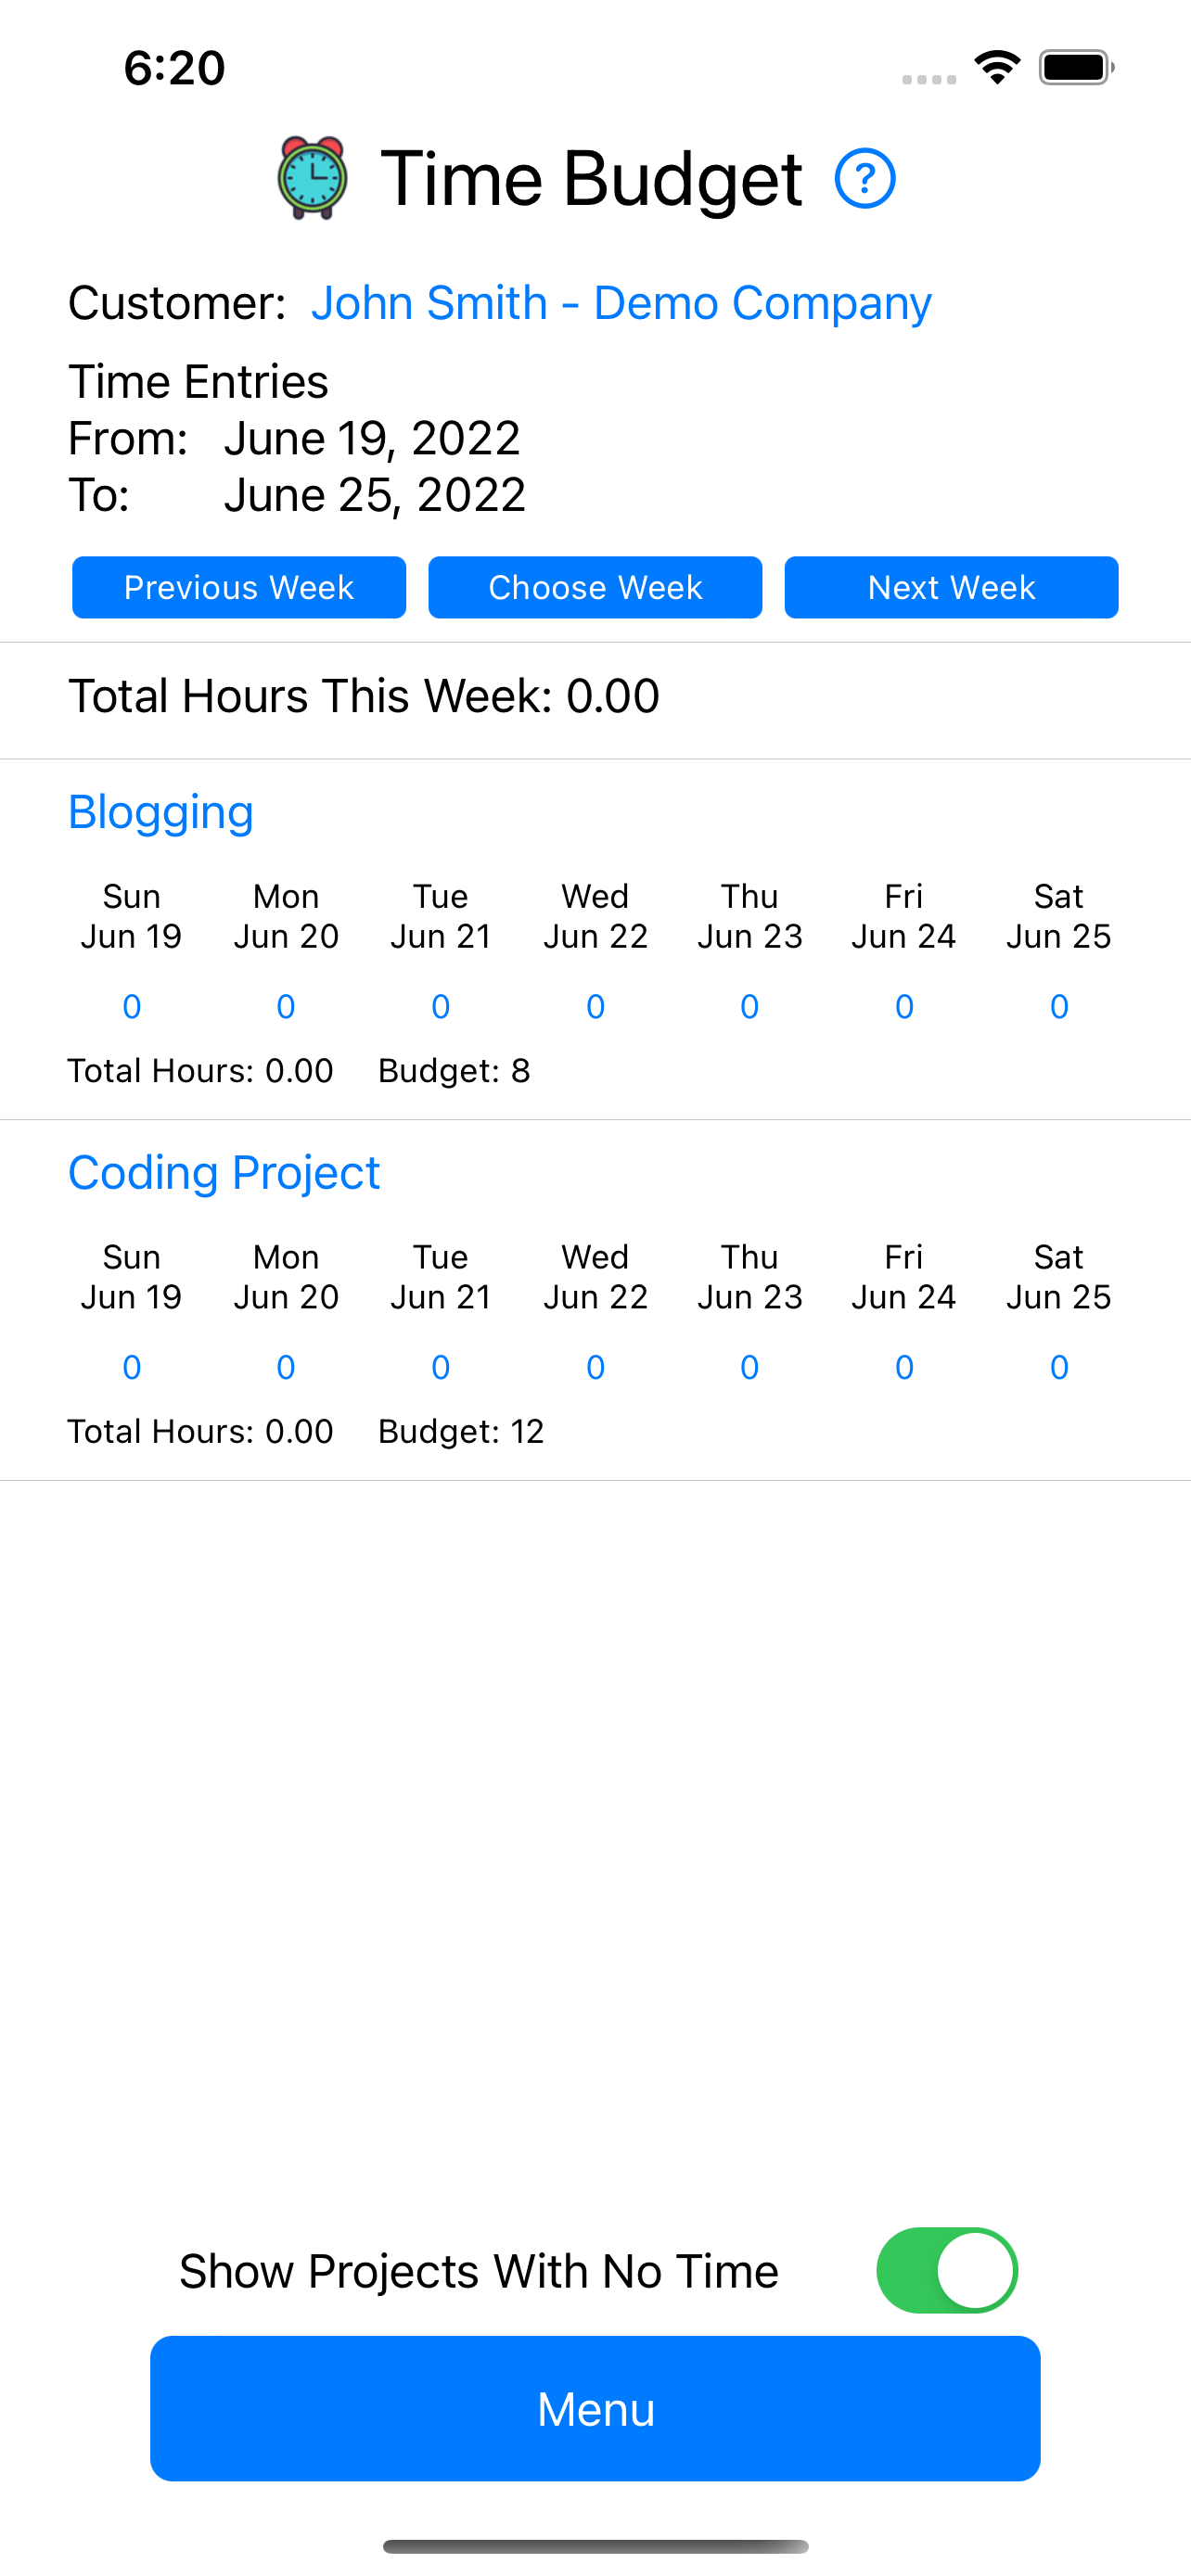
Week View With Projects
After you have created some projects, you will see them listed on the main screen. For example, here is the main screen with two projects listed.
Entering Time
The main use of the Time Budget Mobile application is to record the time you spend working on projects. You can record time in one of two ways:
- Use the New Time Entry command from the menu.
- Press on the time displayed for a day.
New Time Entry Command
Press the Menu button to open the list of available commands, then press the New Time Entry command. This opens a screen where you can enter a new time entry.

To use this screen, press on the text None to bring up the list of projects you have added to the application, then press on the project you want to select. Next, press on the currently displayed date to bring up a date selection control. Use the date selector to pick the day you want to enter time for, then press the OK button.
The final step is to press on the Time In Minutes text box and to enter the number of minutes you spent working on your project. Once you have done that, you can press the Save button in the top right corner to save the time entry. You will then be returned to the main screen.
Pressing on the Displayed Time
The other way to enter the time you have worked on a project is to press on the number displayed below a day of the week for a project. This will bring up the Edit Time Entry screen with the project and date already selected.

This screen is the edit screen for a time entry. You can change the time in minutes for the time entry or you can delete the time entry. All other controls are disabled so you cannot change the project or the date.
Once you enter the time you spent working on this project, press the Save button in the top right corner to save the time entry and return to the main screen.
Reentering a Time Entry
One thing to note about entering time is that when you add a new time entry for a day, it replaces the time entry already existing for that day. For example, if you use the New Time Entry command to add a time entry of 60 minutes for a project on March 4, 2022 then that time entry will be saved and the time for that project on March 4 will be displayed as 60 minutes. If you later enter a new time entry for March 4, 2022 for the same project and enter 90 minutes, this new time entry will replace the old time entry and the time spent on that project for March 4 will now display as 90 minutes.
Creating Projects
When you want to add a new project to the TimeBudget Mobile application, you need to use the New Project command that is available from the Menu button. This will bring up the New Project screen.
Enter the following information for your new project:
- Enter a name for your project.
- Enter a description for your project.
- Enter a weekly budget in hours for your project. This sets a goal for how many hours you want to work on that project each week.
- Choose the customer that the project is for
After entering this information, press the Save button in the top right corner of the screen to finish creating your project. This will save the project and return you to the main screen.
Editing and Deleting Projects
If you want to edit or delete a project that you have added to the Time Budget Mobile application, you can do so by pressing on the name of the project on the main application screen. Pressing on the project name brings up the project edit screen, where you can change the project’s name, description, budget, or customer. You can also delete the project.

After changing the name, description, budget, and/or customer for your project, press the Save button in the top right corner of the screen to save your changes. The project will be updated and you will be returned to the main application screen.
If instead you want to delete the project, press the delete button at the bottom of the edit project screen. You will be prompted to confirm deletion of the project. To go ahead with the deletion, press the Yes button. If you change your mind and don’t want to delete the project, press the No button.
Note that deleting a project also deletes all the time entries you recorded for the project, and there is no way to recover that information after deleting the project, so be careful when deciding whether or not you want to delete a project.
Project List
If you want to view all projects that you have defined for a customer, then you can open the menu from the main screen and press the Projects command. This will open the Projects screen where you can see all projects defined for the currently selected customer.

On the Projects screen you can do the following:
- Switch customers by pressing on the customer name at the top of the screen.
- Edit or delete a project by pressing on the name of the project.
- Create a new project by pressing the New Project button.
- Return to the main screen by pressing the close button.
View Time Entries By Day
The main screen shows you time entries by project. If you want to see time entries by day, press the menu button and then press the View Time Entries By Day command. This opens the week by day screen.

The week view by day screen offers the following commands:
- Customer name:
- Press on the customer name at the top of the screen to change which customer’s projects you are viewing.
- Previous Week button:
- Lets you move to the previous week. Keep pressing this to move to previous weeks.
- Choose Week button:
- Opens a popup screen to let you choose which week you want to view.
- Next Week button:
- Lets you move to the next week. Keep pressing this to move to the next weeks.
- Close Button:
- Returns you to the main screen.
Month Overview
Time Budget Mobile gives you the option to view the total time spent on projects for a month. You do this by opening the Month Overview screen, which displays a list of projects and shows you how many hours you have spent working on each project for the month.
You open the Month Overview screen by pressing the Menu button to open the list of menu commands and then pressing the Month Overview command. This displays the Month Overview screen.

The Month Overview screen has the following commands available:
- Customer name:
- Press on the customer name to change which customer’s projects you are viewing.
- Previous Month button
- This button changes you to the previous month. Keep pressing this button to change which month you are viewing.
- Choose Month button
- This button opens a date selection control to let you choose which month you are viewing.
- Next Month button
- This button changes you to the next month. Keep pressing this button to change which month you are viewing.
- Show Projects With No Time button
- This button switches between showing all projects and showing only projects that have time entries for the month currently being viewed.
- Close button
- This button closes the month view and returns the application back to the normal view of the time entries for a week.
Creating an Invoice
Time Budget Mobile allows you to create and generate invoices. This will allow you to create invoices that you can send to your clients if you are using Time Budget Mobile to track the time you spend working for your clients.
To create and generate an invoice using the Time Budget Mobile application, you need to perform all of the following steps:
- Create an invoice
- Create an invoice template
- Generate the invoice
Step #1: Create an Invoice
The first step you need to follow is to create an invoice using the Invoices screen. You do this by pressing the Menu command to open the list of available commands and then clicking the Invoices command. This will open the invoices screen, which lists all invoices you have created.
The first time you open the invoices screen it will be empty, as shown below:
At the bottom of the screen you will find a New Invoice button and a Close button.The Close button returns you to the main application screen. The New Invoice button opens the New Invoice screen, which is shown below:

The New Invoice screen lets you enter an invoice number, which is pre-populated for you with the next available invoice number. There are also controls for choosing the start and end date for your invoice. All projects that have time entries that fall within the date range for your invoice are displayed below the end date control, and there are buttons beside each project to let you select which projects to include in the invoice. There is also a Select All button that makes it easy for you to assign all projects to your invoice.
In addition, you must choose which customer your invoice is for. You do this by pressing on the text below the word CUSTOMER and then choosing the customer that the invoice is for.
Press on the invoice number and enter a new invoice number if you don’t want to use the suggested invoice number. Next, press on the Start Date and End Date to open a popup screen that lets you choose the start and end dates for your invoice.
When you change the date range for the invoice the project list updates to show all projects with time entries that fall within the newly selected date range. Choose the projects that you want to include in the invoice and then press the Save button on the top right of the screen.
Note that if you pick time entries that have been assigned to another invoice you will get an error message and you won’t be able to create the new invoice. Time Budget Mobile does not let you create more than one invoice for the same time entry.
Note also that after you assign some projects to your invoice that the total time for your invoice will be displayed at the bottom of the screen.
After you have created your invoice it is displayed on the invoices screen:

Step #2 – Create an Invoice Template
The next step in creating an invoice is to create an invoice template. If you are still on the invoices screen, click the Close button to return to the main application screen. Next, press the Menu button and then press the Invoice Templates command. This will open the invoice templates screen, which is initially empty.
The invoice templates screen has two buttons: a New Invoice Template button and a Close button. The close button returns you to the main application screen, while the New Invoice Template button opens a screen where you record your company’s information.
Pressing the New Invoice Template button opens the New Invoice Template screen, which is shown below:

The New Invoice Template screen lets you record the following information for your company:
- Company Name
- Enter your company’s name.
- Logo
- Click the Choose Image button and choose your company’s logo from the images on your phone to assign a logo to your invoice. This will be the logo printed on your invoice when you generate your invoice.
- Address
- Enter the street address portion of your company’s address.
- City
- Enter the city portion of your company’s address.
- State
- Enter the province or state portion of your company’s address.
- Postal Code
- Enter the postal code portion of your company’s address.
- Phone Number
- Enter your company’s phone number.
- Email Address
- Enter your company’s email address.
- Tax Label
- Enter the label you want to display beside the tax amount on your invoices. For example, if you live in Ontario and charge HST to your customers, you would set this value to HST.
After entering all of the information for your company, press the Save button on the top right corner of your screen. Your company will now be displayed in the list of invoice templates.

If you want edit or delete an invoice template, press on the name of the company in the invoice templates list. This will bring up the Edit Invoice Template screen where you can make changes to the invoice template or where you can delete the invoice template.
Step #3 – Generating the Invoice
The final step to creating an invoice is to generate the invoice. Press the Close button on the Invoice Templates screen to return to the main application screen, then press the Menu button and then press the Invoices command on the menu.
On the Invoices screen, press the name of the invoice you want to generate. This will open the Edit Invoice screen, which has a Generate Invoice button.

Press the Generate Invoice button at the bottom of the screen to open the invoice generation screen. There are some controls at the bottom of this screen where you select which invoice template you want to use for the invoice.

Press on the word None beside the Invoice Template label at the bottom of the screen, then choose which invoice template you want to use for this invoice. This will be the company information displayed on your invoice.
After choosing the invoice template, press the Generate Invoice button to generate the invoice. This will generate the invoice and it will prompt you where to save the invoice on your phone.

You can save the invoice to the files on your phone, or you can save the invoice to your iCloud drive if you have enabled iCloud for your phone. After that, you can view the invoice from any app on your phone that has access to the files on your phone, such as the Files app.
After generating the invoice and saving it to your phone you can press the Close button to return to the Invoices screen. You can then press the Close button again to return to the main application screen.
Synchronizing Data
Time Budget Mobile offers you the option to synchronize data with the desktop version of the Time Budget application, which is an application that runs on the Microsoft Windows operating system. To synchronize data with the desktop version of Time Budget, press the Menu button and then press the Synchronize Data button. This will open a screen where you can enter the IP address of the computer that is running the desktop version of Time Budget.

Before you can synchronize data, the share data on network screen must be opened from the desktop version of Time Budget. This will display a screen that shows you the IP address of your computer, which is the IP address you want to enter on the synchronize data screen on your phone.
After entering the IP address on your phone, press the Continue button to synchronize the data between your phone and desktop computer. A series of messages will be displayed as data is being synchronized, and then a final completion message will be displayed once data synchronization is complete.